How to Connect Two Routers Wirelessly

What a shocking thing, right? Did you also think that you needed to know rocket science to connect two routers wirelessly? Well, I won’t lie, I used to think too!
But Expanding your Wi-Fi network is easier than we think. This technique is very useful, You can cover dead zones in your home where the signal just doesn’t usually reach. More like creating a mesh router setup with your normal routers. This will allow you to use wifi seamlessly everywhere in your home.
Let’s dive into the detailed step-by-step guide on how to connect two routers wirelessly in an easy way.
What Do You Need to Make This Magic Happen?
All you need are two wireless routers to pull off this magic! Let’s say you’ve got two TP-Link routers. Perhaps you bought them for different reasons. But now, even with your recently installed powerful router, your Wi-Fi doesn’t reach every corner of your house.
Then you suddenly remember—there’s an old router tucked away in storage. Wouldn’t it be amazing if you could use it to amplify your network and cover your entire home? Guess what? You absolutely can!
Here’s all you’ll need:
- One Primary Router: This is the router plugged into your network via the WAN port.
- One Secondary Router: This router will wirelessly connect to the primary one to extend the signal.
And that’s it! No fancy tools or extra gadgets—just these two routers. Simple, right?
How to Connect Two Routers Wirelessly
We’re going to use a straightforward method to connect two routers. There are several ways to link routers wirelessly, such as:
- Wireless Bridge Mode (WDS Bridging)
- Mesh Networking
- Repeater/Range Extender Mode
- Third-Party Firmware Solutions
While these methods are maybe effective, But they can be complicated or require extra gadgets. Instead, we’ll focus on a simpler option called Point-to-Point Mode.
Why this method? It’s easy, hassle-free, and doesn’t need any extra hardware. Let’s break it down step by step so you can follow along effortlessly.
Step 1: Ensure the Primary Router is Set Up Properly
First, we need to confirm that the primary router is functioning well. This router should already be connected to the internet, acting as the foundation of your network. Most of the time, you won’t need to tweak much to connect your secondary router.
However, there’s one thing you can do to make things smoother.
Open your web browser and type 192.168.0.1 into the address bar. This will take you to the TP-Link admin portal. Once there, log in using your admin username and password.
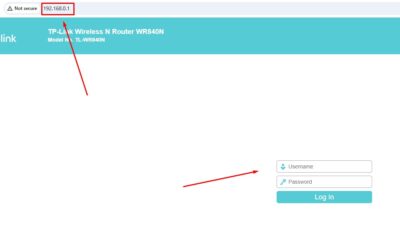
Next, navigate to Wireless Settings > Advanced Settings in the admin portal. Look for the Channel Number option and change it to a different number to help your secondary router identify the primary router more easily. For example, you can set it to Channel 11. Don’t forget to save the changes! This is not mandatory, but this will make your work a lot easier.
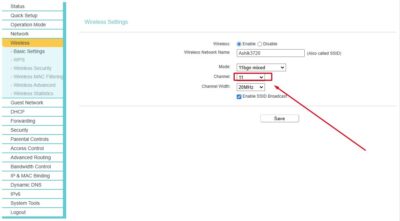
That’s all for the primary router! Once it’s set up, you’re good to go. Now, let’s move on to the secondary router and configure it to connect with the primary one.
Step 2: Reset the secondary Router
First, reset the secondary router to remove any previous settings that might interfere with the connection to the primary router. Resetting ensures you’re starting with a clean slate.
Not sure how to reset it? Simply press and hold the reset button on the router for a few seconds. Once the reset is complete, the router will be ready for fresh configuration.

Step 3: Connect Your Secondary Router to a PC for Easy Setup
This step isn’t mandatory, but it’s highly recommended. Connecting your secondary router to a PC via a LAN port makes the configuration process smoother and less frustrating.
You might wonder, “Can’t I just use my phone to configure it?” Sure, you can! But here’s the thing: during the setup process, your phone or any device connected to the secondary router might get disconnected multiple times.
This can be pretty annoying. Using a PC with a LAN cable ensures a stable connection throughout the setup, saving you time and preventing interruptions.

Step 4: Set Up Your Secondary Router
Using the PC connected to your secondary router via the LAN port, open a web browser and type 192.168.0.1 into the address bar. This will take you to the router’s login page.
Once logged in, navigate to the Wireless Security section. To secure your secondary router, update the password to something strong and unique. Don’t forget to save the changes!
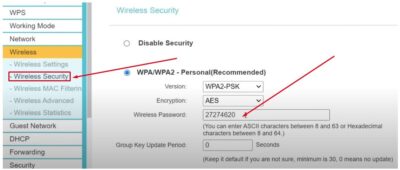
Step 5: Change the IP Address of the Secondary Router
Next, you’ll need to change the IP address of the secondary router. Don’t worry—it’s simple and straightforward!
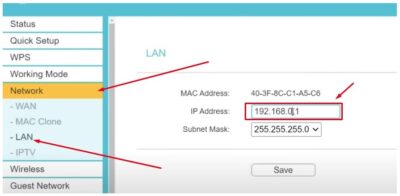
- Log in to the router’s admin portal and look for the Network option in the control panel.
- Under Network, select LAN settings.
- You’ll see a box for the IP address, which will likely be set to 192.168.0.1 by default.
- Change the third digit from 0 to 2, so it becomes 192.168.2.1.
You can use other numbers if needed, but ensure it doesn’t conflict with your primary router’s IP address.
- Once updated, click Save. The router will restart automatically, and this process may take a few minutes.
And that’s it—you’ve successfully updated the IP address!
Step 6: Enable WDS Bridging on Your Secondary Router
Once your router restarts, it will take you back to the login page. Log in again using your admin username and password to access the admin panel.
Here’s what to do next:
- Go to the Wireless option in the menu.
- Select Wireless Settings under that section.
- Scroll down to find the WDS Bridging option.
- Check the box to Enable WDS Bridging.
This step ensures that your secondary router can connect to the primary one wirelessly.

Step 7: Start the Survey – Find and Connect to the Primary Router
Once you’ve enabled WDS Bridging, additional options will appear below. Look for the Survey button in this section and click on it.
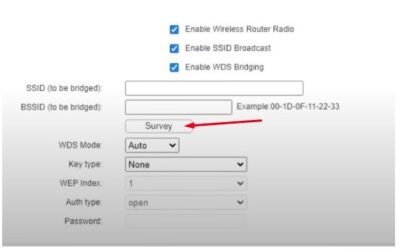
You’ll now see a list of access points from your neighborhood. Look through the list and locate your primary router by its name (SSID). Once you find it, simply click Connect to link the secondary router to the primary one.
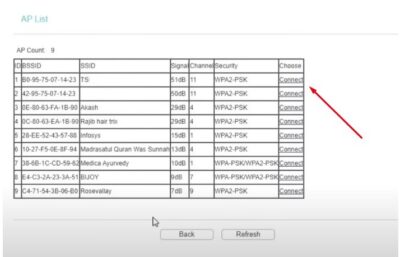
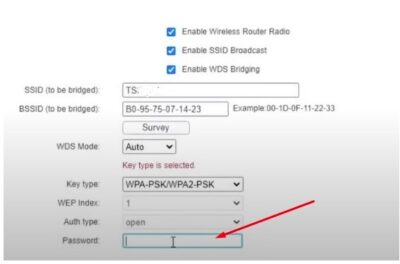
After clicking Connect, you’ll be redirected to the previous page. Here, you’ll see a password box. Simply enter the password of your primary router into the box and click Save.
Step 8: Disable the Secondary Router’s DHCP Option
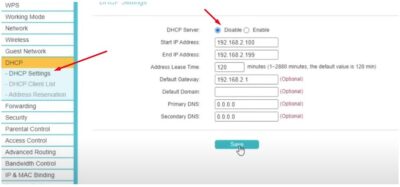
Next, navigate to the DHCP option in the admin panel of your secondary router.
Why disable it? Since your secondary router is relying on the primary router for the network, it shouldn’t generate its own IP addresses. All IP addresses will now be managed by the primary router. Simply select Disable for the DHCP option and save the settings.
All Done! Your Secondary Router is Now Online
That’s it—you’re all set! Take your phone or laptop and open the Wi-Fi settings. You’ll notice that the secondary router is now online and ready to provide internet access.
Here’s the cool part: the secondary router doesn’t need its own WAN connection. It’s powered entirely by the primary router, extending the network seamlessly across your home.
Just connect to the secondary router’s Wi-Fi, and enjoy uninterrupted internet coverage throughout your space!
Pros and Cons of Connecting Two Routers Using Point-to-Point Mode
Here are the advantages and disadvantages of connecting two routers wirelessly in Point-to-Point mode:
Pros of point-to-point mode
Extended Coverage
This setup helps eliminate Wi-Fi dead zones in your home, providing stronger signals in every corner.
No Extra Cost
You can utilize an old router without buying additional hardware like range extenders or mesh systems.
Simple Setup
The step-by-step process is beginner-friendly and doesn’t require professional assistance or advanced technical skills.
No Cables Required
Unlike wired connections, this wireless setup avoids the clutter of cables running between two routers.
Scalability
You can repeat this process to connect additional routers if your coverage area increases.
Seamless Connectivity
Devices automatically connect to the stronger signal, ensuring uninterrupted browsing and streaming.
Cost-Effective Network Expansion
Ideal for those on a budget, as it uses existing resources to expand the network.
Cons point-to-point mode
Reduced Speed
Wireless bridging may lead to reduced speeds on the secondary router due to shared bandwidth.
Complex Troubleshooting
If something goes wrong, identifying and fixing issues can be challenging, especially for non-tech-savvy users.
Limited Distance
The two routers must remain within a reasonable distance to maintain a stable connection. Walls or interference may weaken the signal.
Compatibility Issues
Not all routers support WDS Bridging or Point-to-Point mode. Ensure both routers are compatible before proceeding.
Inconsistent Performance
Environmental factors like interference from other networks or devices can impact the reliability of the connection.
Device Limitations
The secondary router may not support as many devices as the primary router due to resource sharing.
FAQs: Connecting Two Routers Wirelessly
1. Can I connect two routers wirelessly without a cable?
Yes, you can use Point-to-Point mode or WDS Bridging to connect two routers wirelessly, without the need for a physical cable.
2. What is the main benefit of connecting two routers wirelessly?
The main benefit is extended Wi-Fi coverage in areas with weak or no signal, without requiring additional hardware or cables.
3. Do both routers need to be from the same brand?
No, but it’s recommended. Using routers from the same brand can ensure compatibility and simplify setup.
4. What is WDS Bridging, and why is it needed?
WDS (Wireless Distribution System) Bridging allows two routers to communicate wirelessly, enabling the secondary router to extend the primary router’s network.
5. Will my internet speed drop with this setup?
Yes, the speed on the secondary router might reduce because it shares bandwidth with the primary router.
6. Can I use this setup with any router?
Not all routers support WDS Bridging or Point-to-Point mode. Check your router’s specifications to confirm compatibility.
7. What is the role of the secondary router in this setup?
The secondary router acts as a repeater, boosting and extending the Wi-Fi signal from the primary router.
8. Do I need to disable DHCP on the secondary router?
Yes, disabling DHCP on the secondary router prevents it from assigning IP addresses, avoiding conflicts with the primary router.
9. How far apart can the two routers be?
The distance depends on the routers’ range and signal strength. Ensure there are minimal obstacles like walls to maintain a strong connection.
10. Can I use this method to create a mesh network?
No, this setup does not create a true mesh network. However, it mimics some mesh-like features by extending Wi-Fi coverage.
11. Will the secondary router need a separate internet connection?
No, the secondary router relies on the primary router’s internet connection, so a separate WAN connection is unnecessary.
12. Is this setup secure?
Yes, as long as you configure strong passwords and enable encryption, the setup is secure against unauthorized access.


 Smartwatch
 Smart Ring
 Smart Band
 Batteries
 Ups
Ups Power Bank
 TWS
TWS Bluetooth Speaker
 Headphones
 Neckband
 Microphones
 Tripods
 Studio Light
 Tracking Device
 Portable Fan
 Power Adapters
 Portable Speaker
 Rechargeable Fan
 Smart Clock
 WiFi Routers
 Kitchen Gadgets
 Air Cooler
 Acrylic Night Lamps
 Display Gadgets
 Neon Lights
 Ambient Lighting
 Camping Fan
 Camping Gear
 Camping Light
 Survival Gadgets
 RC Boat
 RC Car
 RC Planes & Drones